April 2003 Article Tennis Server
|

 |
Pick up any tennis magazine or book and you'll find instruction and advice on the full range of stroke production: forehands, backhands, overheads, serves, volleys. You name it - you can find information on technique and effective practices. However, there haven't been many biomechanic technology-based or scientific studies conducted and published on footwork in academic journals. Yet footwork is a major source of lost points in tennis. You have to reach the ball in time to swing and your body needs to be in a good biomechanical position to strike the ball effectively. Being "off balance" or stretching to reach the ball results in loss of power and control. You may not be able to rotate your body to obtain optimum power or control and place the ball in your opponent's court effectively. I'd like to share an interesting project on which two colleagues and I collaborated. A few years back, we attempted a computer simulation of a tennis player. The skeleton and full body model below are examples of that work.
On one of our visits with Dr. Paul Roetert at the USTA (then the USTA's administrator of sport science, now Managing Director USA Tennis High Performance Program in Key Biscayne, FL), he told us adding muscles to the skeleton would create a better tool. Coaches, trainers and even players would be able to see and understand the muscles activated during play. This could aid in understanding why and how certain muscles are developed for tennis. Adding muscles to the skeleton would be a big job, but with support from the USTA our group was up for the task. We all wanted to create a model with a smoother and more realistic motion than the team's previous models. In addition to skeletal motion, muscles "flex." We decided that a "proof of concept" would be developed. Instead of creating a new model for the entire human body, the team would start with a smaller test case. A general rule in research: if a technique doesn't work for a simple case, it typically will not work for a more complicated situation. Once the technique works for a simpler case you can extend it to a more complicated one. We felt the leg, from the kneecap to the foot, would be ideal. Compared to other parts of the body, leg motion is fairly limited in direction and range of motion.
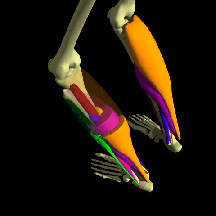
Compare the motion of your knee to the range of motion of your wrist or your shoulder. The knee, wrist and shoulder act as different types of joints. Your knee acts like a hinge. Think of a door or cabinet hinge. The door can open and close, but doesn't operate in any other direction. There are also different types of muscles. Bend your leg at the knee and then straighten your leg to its original position. Bending a joint is referred to as flexion; straightening that bent limb is called extension. Muscles operate with a pulling motion. Muscles do not push. In general there is a muscle (or set of muscles) that are used to bend joints and limbs - these are called flexors. Different muscles, called extensors, are used to straighten the limb. Unlike the knee joint, the wrist acts like a universal joint (a combination of two hinges). While the door hinge can move in one direction, the universal joint moves back and forth in two directions. The shoulder has one of the most complicated motions. It acts like a ball-and-socket joint and can move and rotate in multiple directions. There would be two major tasks in this part of the footwork project: 1) create the new 3-dimensional model and 2) capture a player's motion from the high speed video footage and apply that motion to the 3D model. Chad Okamoto, our company's graphic artist and animator created a new and more realistic skeleton from the hips down. All major leg muscles were added to the skeleton, from the knee to the ankle. Each muscle was drawn in a different color to make the muscles easier to see. The muscles were given a flexing motion. Links to 6 movies of the 3D model are listed here. Next to the link is the file size and file format .mov or .mpg. You might want to download and save the files on your computer and use them with your computer's movie player software. The motion may look smoother on your own computer versus the web. Set your movie player to "play all frames" and you can use the "loop" feature on your movie player to repeat the motion. If you view the movie from the web try using the "frame by frame" feature on the movie player to make sure you get all the frames.
Have you ever heard the expression, "learn to walk before you run"? We did the same with our model. Initially, our animator had the model stand on its toes. This foot flex was a precursor to the "unweighting" motion from the ready position in tennis. Next a walking motion was applied to the model. Even the kneecap slides over the other leg bones when bending - you can see this in the walking simulation.
Keep in mind that this is a 3D model versus 2D animations. In 2D animation you draw (or have the software draw) the different frames of the animation. In 2D animation when your character needs to turn from back to front, you must draw the character's back and front. Unlike the 2D animation, we only have to build the 3D model once. If we need to see the back of the character, the 3D model is turned so that you can see its back. Instead of drawing the character's action, different motion files can be applied to the 3D model. It's more like a computer marionette. The marionette is a 3D computer generated model and different motions are choreographed for the model to perform. After the first model was done, USTA sport science staff and committee members reviewed the model. They asked if something could be done to the model to make it more obvious that the muscles were flexing. The model was modified so that the muscle color would intensify as the muscles shorten.
In the meantime, project staff captured a computer data file containing information on the motion for each joint. Using high speed footage from the US Open, different joint positions were recorded at each time step during the player's stroke. This motion file was applied to the 3D model.
Although the original footage was shot facing the player from the opposite court, with a 3D model we can create a view from behind the player. The model can be spun around, zoomed in or out of and viewed from any angle. It can even be cutaway to show the underlying muscles. Everyone was quite pleased with the results. Many Thanks: I'd like to acknowledge the USTA Sport Science Committee for their support of this project through a grant and Nick Saviano, Dr. Bill Aronson, Dr. Paul Roetert, Dr. Duane Knudson and Marcie Londano for their input and support. Cislunar Aerospace staff member Eric Chattot did an excellent job of capturing the player motions from the footage. Last, my friend and co-worker, the late Chad Okamoto did a wonderful job creating the 3D model and I dedicate this column to him. Until next month ... Jani
This column is copyrighted by Jani Macari Pallis, Ph.D., all rights
reserved.
Dr. Jani Macari Pallis is the founder and CEO of Cislunar Aerospace,
Inc., an engineering and research firm in San Francisco. In addition
to her engineering practice, she has led two collaborations between
NASA and Cislunar, creating educational materials on the aerodynamics
of sports for pre-college students and educators. As the head of
NASA's "Aerodynamics in Sports" project, she has led a team of
researchers investigating the aerodynamics, physics and biomechanics
of tennis. The group has conducted high speed video data capture at
the US Open and research of ball/court interaction, footwork, serve
speeds, trajectories and ball aerodynamics. Pallis received a BS and
MS from the Georgia Institute of Technology, an MS in mechanical
engineering from the University of California, Berkeley and a Ph.D.
in mechanical and aeronautical engineering from the University of
California, Davis. She is a member of the Executive Committee of The
International Sports Engineering Association.
Questions and comments about these columns can be directed to Jani by
using this form.
|


October 2022 Tennis Anyone: Patterns in Doubles by John Mills. September 2022 Tennis Anyone: Short Court by John Mills. |
 You will join 13,000 other subscribers in receiving news of updates to the Tennis Server along with monthly tennis tips from tennis pro Tom Veneziano.


